Trim A Video For A Mac
How to Cut, Slice, Trim A Video on Mac and Windows? Nothing Easier Than VideoProc! - Cut, slice, trim any parts of a video, shuffle and splice the clips into a single one. - Split a long footage into several segments at the same length. How to trim a video and remove unwanted parts in Windows, Android, Mac Movavi Video Cutter. Movavi video cutter is an amazing video editing software with simple and intuitive interface. The interface is so simple yo you can master video editing in this software within 10 minutes. It is available for Windows as well as for Mac. The working of.
I saw your earlier article about how to use third party software to sequence, but can’t I use Quicktime or iMovie to do the same on my Mac system? You can certainly use third party software like the Joyoshare program mentioned in that article, but you’re right that on the MacOS X system there are programs already included with your computer that can manage the task too.

I’ll show you how to chop out a segment from a video in Quicktime Player. Before we start, though, let me say that Quicktime Player has quite a few capabilities hidden in its depths, including the ability to record everything you do on your computer as a video, with or without your own narration! Not only that, it can also record off your Webcam camera so you can use it as a simple way to record a video greeting to a friend, for example, or even be more creative: I’ve posted more than one video on that was recorded directly from my MacBook Pro with Quicktime Player! But let’s get back to the video, shall we? To start, it’s easy: Open up your master video in Quicktime Player. It’ll look like this: Look at the bottom control window and you can see the full video sequence is 25 seconds long.
Problem is, I only want the middle six seconds of this footage. To do that, check out the Edit menu. It’s got quite a few options! As highlighted, this task requires the “ Trim” option, so either press Cmd-T or choose it from the Edit menu.
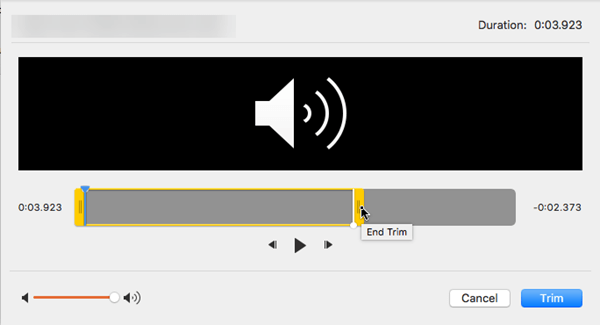
Now the window gains a new overlay, the video timeline: As you would hope from Apple, it’s super easy to work with. Simply click and drag the double vertical bar on the edge of the yellow box to move the start point (from the left) or end point (from the right).
As you drag it (“scrub it”, as they say in video editing circles) you’ll see the main view changes to sync. Move backwards and you’ll see the video play backwards. But, uh, stay focused. For me, once I get the start point adjusted, it now looks like this: I’ll do the same thing to adjust the end point to be exactly what I want. Notice as you go that if you stop moving it’ll actually “zoom in” to give you a finer level of control over exactly what frame you choose, which is quite handy: And, finally, once you let go of the handle, it’ll pop back to the regular full video view: You can see that I only have a tiny segment of the overall video, but that’s what I wanted, so it’s looking good.
I can now press Play and it’ll just show that segment, making it easy for me to fine tune frame-by-frame to get the exact start and stop points needed. Since I have a MacBook Pro with TouchBar, a neat thing happens on the TouchBar itself: The timeline shows up on the TouchBar itself. Check it out: I prefer working with what’s on screen, but the TouchBar version does make it easy to do the coarse initial start and stop quick and easy, then the big screen is good for that fine tuning that makes a good segment a great one! A click on the “Trim” button on either the big screen or a tap on the TouchBar and I have a new untitled video sequence that’s just the subset of the original footage: Notice above that it’s 6 seconds long. Simply save it as usual (e.g., File > Save) and you’re done. Curious about the footage? Here it is, ready to view. How to get chrome on a mac.