How To Make A Partition For Mac On Windows 10
Mar 04, 2017 In this video we will see How to reformat and partition a hard drive on a Windows PC. Disk partitioning is essentially separating the hard disk into different sections or parts for storage. 3 days ago - Both computers have the necessary tools to help you partition a new drive once you. Dark mode macos mojave vs windows 10 mac header.
About Windows 10 Disk Management Windows 10 is the latest Operating System (OS) released by Microsoft. It improves much compared with Windows 8 such as adding the Start Menu seen in Windows 7, a virtual desktop system, a voice assistant named Cortana, Xbox app and streaming, and Edge browser. Disk Management is a built-in tool in Windows 10 which is widely known by PC users. It is able to help you manage hard disk partitions without rebooting system and any interruption. It is a convenient tool for Windows 10 users. The features of Windows 10 Disk Management are as follows: • Create, delete and format partitions.
• Change drive letter and paths. • Mark partition as active. • Explore partition to view files. • Extend and shrink partition. 
• Add mirror. • Initialize a brand new disk before you can use it. • Convert empty MBR to GPT disk, and vice versa. • Convert empty dynamic disk to basic disk. • More about. Extend Partition with Windows 10 Disk Management Maybe most of Windows 10 desktop and laptop users have come across the problem of low disk space, especially for system partition.
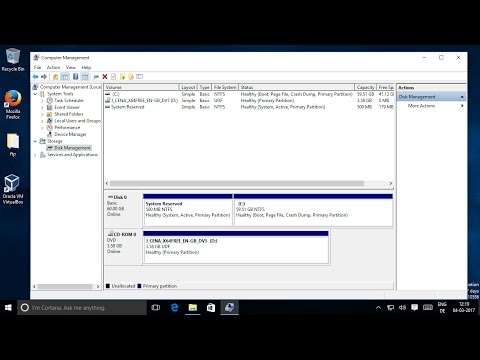
With Disk Management in Windows 10, you can reduce the influence of low disk space in some ways. To use this tool, you should know how to open Windows 10 Disk Management, so we introduce 3 ways for you. • Way 1: The easiest way to open Disk Management in Windows 10 is from computer Desktop. Right click on Start Menu (or press Windows+X hotkey) and then select 'Disk Management'.
What’s more, with the program, you can also transfer media files from iPhone to Mac, or from iTunes to iPhone. You can sync photos&videos from iPhone/iPad/Android to iPhone 7(Plus) within seconds and without any file erased. How to Transfer Photos from Mac to iPhone 7/7 Plus; Part 2. How to Transfer Videos from Mac to iPhone 7/7 Plus; Step 1. Transfer iphone 7 video to mac for edit. Select the videos you want to upload to computer, and then click “import selected” to transfer videos from iPad or iPhone to iPhoto library. Transfer videos from camera roll to Mac. In the left toolbar, click 'Last Import' and go to top toolbar to find 'Edit', click 'Copy' in the drop-down list. The software supports to transfer GoPro video to iPhone in batch. Finally, click on 'Sync' to start importing GoPro footages, clips, videos to iPhone for viewing, editing or sharing. Also check out the guide on how to edit GoPro videos. It's the same to sync GoPro videos to iPad and transfer GoPro photos to iPhone, iPad, iPod. How to Transfer Any Files from iPhone to Macbook Pro/Air, iMac. This guide shows you how to sync music from iPhone 7/7 Plus/SE/6S/6 Plus to Macbook Pro/Air with the iPhone files transfer. Similarly, the same steps applies to copy iPhone photos and videos to Mac/Windows for eternal files backup. How to transfer iPhone videos and photos to Mac. For Mac user, you can use this iPhone Transfer for Mac. It's easy to use and works for all series of iPhone including iPhone 5, iPhone 4, iPhone 3GS, iPhone 3G and iPhone. Download iPhone Transfer for Mac, double clicks to install it. Connect your iPhone to the Mac and then run the iPhone Transfer for Mac.
• Way 2: Use Windows+R hotkey to open Run window. Then type 'Diskmgmt.msc' and click 'OK' or hit 'Enter' key. • Way 3: Directly type 'disk management' in the Search box and choose 'Create and format hard disk partitions' from the results. After you open Disk Management, right click the partition you would like to expand and then choose Extend Volume (e.g. C partition). When you use Windows 10 Disk Management to extend a partition, sometimes you may find the Extend Volume option is grayed out. Is there something wrong with this tool?
No, the reason is that the function of Extend Volume in Windows 10 is only available when there is contiguous unallocated space behind the partition you would like to extend. What can you do when you don't have unallocated space on hard drive? Fortunately, the third-party disk partition software - allows you to extend partition whether or not there is unallocated space next to the partition you plan to extend. What's more, you can even enlarge partition without unallocated space on hard drive.