Format Usb Drive For Mac Win
Windows command linecmd for mac. Share on Facebook Tweet this Share Compatibility issues between Microsoft Windows and Apple MacOS may have diminished sharply over the years, but that doesn’t mean they’ve completely disappeared. Today, if you go out and buy a new external hard drive, you may notice that working between the two is an often demoralizing task. But it doesn’t need to be.
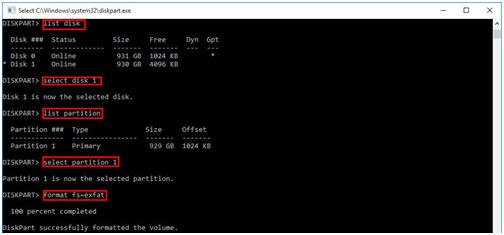
Here they are: 1. Use Disk Utility to Format USB Flash Drive on Mac. Use Terminal to Format USB Drive on Mac.
Fortunately, there is a solution. You can, or divide into different sections with different rules and functions.
In this case, you can partition your drive so that part of it works properly with MacOS, and part of it works properly with Windows, avoiding the issues that can crop up. Both computers have the necessary tools to help you partition a new drive once you have it connected! A quick Google search may lead you to believe you’re on the right path. Unless every file you plan to store on the disk is less than 4GB in size, you may be better off avoiding this method, instead opting for the more storage efficient, reliable, and secure NTFS and Mac OS Extended file systems. We’ll go over what you need to do. Partition the drive on Windows 10 We do have a guide on how to.
But let’s go through the important steps you need to know to quickly partition the drive while working on Windows. On a PC, the process is less straightforward than what you’d see on a Mac, but it’s easier than it used to be. Step 1: On Windows 10, locate Cortana on the bottom left-hand corner of the screen and search Create and format hard disk partitions. The Disk Management window will proceed to open up. Step 2: If you haven’t formatted the drive already, you’ll want to do that now. To do this, you’ll want to find the disk in the lower half of Disk Management.
If you don’t have any additional drives attached, aside from the one built into your computer, it should be recognized as Disk 1. Typically, when you buy an external hard drive it will be formatted out of the box. Depending on a number of factors, however, your drive may be labeled “Not Initialized,” such as the 4TB drive exhibited above. If this is the case for you, right-click the drive you want to format and click Initialize Disk. This will prompt a new window, asking you to select a partition style for your disk. If you’re going to be using the drive with a version of Windows prior to Windows Vista, you’re going to want to go with MBR.
With that being said, MBR is only compatible with disks up to 2TB in capacity. Therefore, if you’re like most of us and you want to get the most out of your external hard drive, GPT is the way to go. Click OK when you’ve made your decision.
Step 3: Now that you’ve initialized the drive, you should have a drive listed, labeled Unallocated. Right-click the box where it says this and select New Simple Volume. This will thereby initiate the New Simple Volume Wizard.
Click Next and you’ll be asked to specify the size of your volume. The volume is the same as a partition. In Windows, the only partition type you can create with read/write compatibility on a Mac is exFAT.
For the purpose of this article, we decided to open the Windows 10 Calculator app by searching Calculator in Cortana and divided the maximum disk space in half. This way, we could dedicate half of the storage space to the Mac-friendly FAT32 format and the other half to the NTFS format on PC. Step 4: Click Next then you’ll be asked to assign a drive letter to the new volume. We’re calling ours G by default, but you use any letter you’d like to properly identify the disk when it’s in use. After proceeding to the next page, select the file system exFat and keep the allocation unit size at the default. As a standard user, Microsoft advises against changing the allocation unit size. Again, you can assign whatever volume label you’d like, so long as it makes it easy to identify the drive when in use.
For this reason, we opted for MacOS, a simple reminder that this partition will be used in conjunction with my Mac. Keep the box beside Perform a quick format checked and click Next to move on to the next screen. Step 5: On the next page, make sure everything is correct and select Finish. Now repeat this process for Windows. Is there calendar app for mac and iphone that can syn between themes. However, this time, instead of using the file system exFat, you’ll want to go with NTFS.