Outlook For Mac Single Line View
Outlook for Office 365 Outlook 2019 Outlook 2016 Outlook 2013 Outlook 2010 Flags make it easier to find and track email messages in Outlook. You can flag messages for yourself, as visual reminders to take action later.
You can also flag messages that you send to other people, to direct their attention or track their responses. Review all flagged messages In the Inbox You can quickly sort the Inbox to display all flagged items together. Do one of the following: • In multi-line view, click Arranged by, and then click Flag: Start Date or Flag: Due Date. • In single-line view, click the Flag Status column header. Use a Search Folder Messages that you flag appear automatically in the For Follow Up Search Folder.
If the folder was deleted, you can re-create the Search Folder. • On the Folder tab, in the New group, click New Search Folder.  • In the New Search Folder dialog box, under Reading Mail, select Mail flagged for follow up, and then click OK. Note: This feature requires that the recipients also use Outlook. Sort the Sent Items folder You can quickly sort your Sent Items folder to display all flagged items together. Do one of the following: • In multi-line view, click Arranged by, and then click Flag: Start Date or Flag: Due Date. • In single-line view, click the Flag Status column header.
Search in your Sent Items folder You can refine a search for flagged responses by using additional criteria — the message subject or sender. • Open the Sent Items folder, right-click the flagged message that you want to search, point to Find Related, and then click Messages in This Conversation or Messages from Sender.
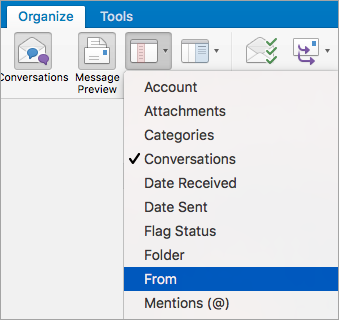
Hi, Unfortunately, there is no Compact View button in Outlook for Mac. If you want to set the view in Outlook for Mac, we can click the Organize tab, click Arrange By, and then click an option. Additionally, if the reading pane is hidden or positioned below the item list, you can choose the columns you want to appear at the top of the item list. The available columns vary, depending on the type of items in the list. 1.On the Organize tab, click Reading Pane, and then make sure that Bottom or Off is selected. 2.On the View menu, point to Columns, and then click a column name.
Columns in the current view are identified with a check mark. For more information about Customize views in Outlook 2016 for Mac, please refer to: Regards, Winnie Liang TechNet Community Support Please mark the reply as an answer if you find it is helpful.
Outlook for Windows will follow in July, with Outlook for Mac getting it this update in August. Another new feature that’s less about the design but the user experience is the launch of what. Outlook 2016/2013 for Windows will automatically load any account that you have been granted full mailbox permissions to, Outlook 2016 for Mac will not. In Outlook 2016/2013, accounts that you have full mailbox permission to -- including any linked accounts -- will be added to your account list automatically.
If you have feedback for TechNet Support, contact. Hi, Unfortunately, there is no Compact View button in Outlook for Mac. If you want to set the view in Outlook for Mac, we can click the Organize tab, click Arrange By, and then click an option. Additionally, if the reading pane is hidden or positioned below the item list, you can choose the columns you want to appear at the top of the item list.
The available columns vary, depending on the type of items in the list. 1.On the Organize tab, click Reading Pane, and then make sure that Bottom or Off is selected.
2.On the View menu, point to Columns, and then click a column name. Columns in the current view are identified with a check mark. For more information about Customize views in Outlook 2016 for Mac, please refer to: Regards, Winnie Liang TechNet Community Support Please mark the reply as an answer if you find it is helpful.
(Each person collaborating gets a different color). How to share a excel for mac free. Other users will have to choose “Edit in Browser” if they want to collaborate with you. Once they’ve made a selection and begun editing the workbook, you see the changes they make in real time via a colored cursor that indicates their presence in the file.
If you have feedback for TechNet Support, contact.